


The iPhone 17 sequence is one in every of Apple’s boldest in latest reminiscence. The bottom iPhone 17 has adopted as soon as Professional-only options, such because the long-requested 120Hz ProMotion Show, whereas the iPhone Air pushes the boundaries of design and engineering, and the iPhone 17 Professional and Professional Max boast a swathe of really skilled new options, together with ProRes RAW and GenLock.
Additionally they arrive with the newest iOS 26 person expertise, a visible departure from the flat interface of earlier releases. Liquid Glass, plus just a few notable additions, modifications the look, really feel and behavior of iOS in new and fascinating methods.
Whether or not you’re new to the iPhone 17 sequence or a long-time iPhone person upgrading to one in every of Apple’s finest and brightest new entries, you’ll undoubtedly discover some useful suggestions and methods on this information. It’s written by somebody who’s reviewed nearly each mannequin of the final decade, and spent quite a lot of time optimising the iOS expertise because of this.
The vast majority of the following tips ought to work throughout the iPhone 17, iPhone Air, iPhone 17 Professional and iPhone 17 Professional Max, in addition to latest however older fashions. Learn on for the complete run-down.
Customise the lock display clock
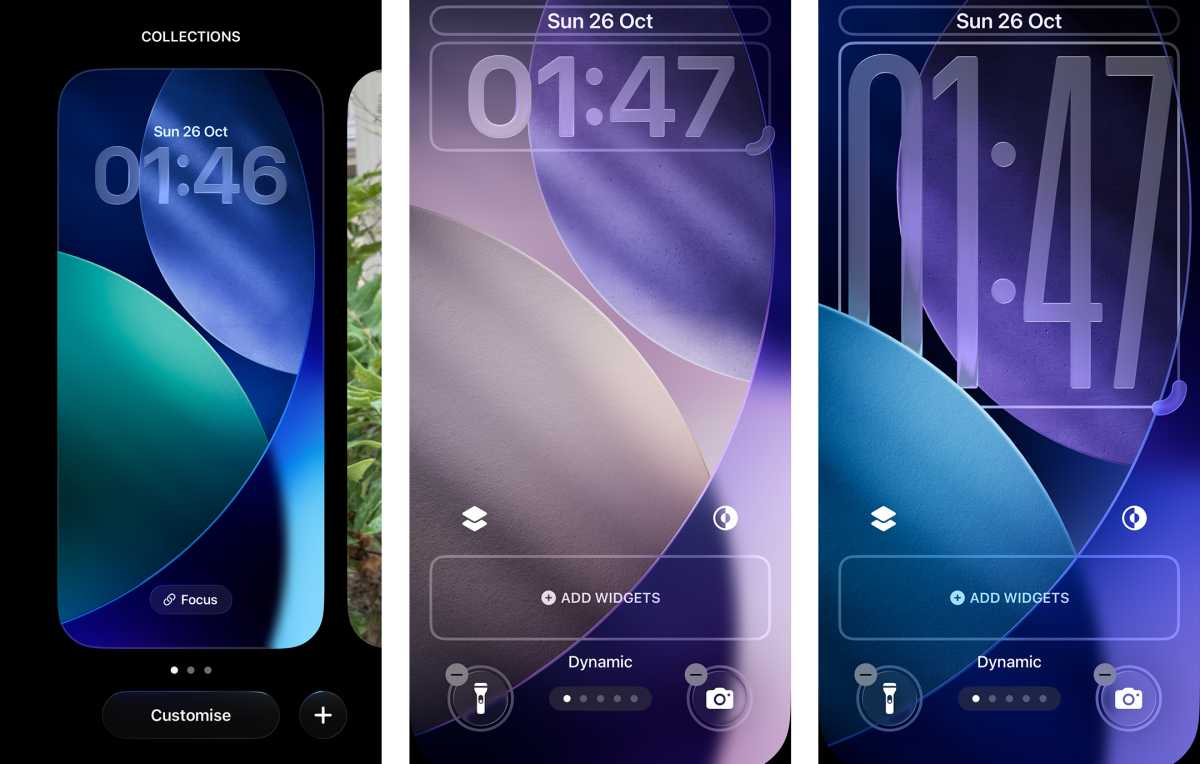
With iOS 16, Apple added the flexibility to customize the lock display clock’s font and color however, with iOS 26, it expanded on the diploma of personalisation obtainable.
Now, you even have the choice to scale the clock which, paired with the All the time On Show, makes for a helpful one-two punch of performance. You can even nonetheless customise font and color, in addition to select whether or not it adopts the Liquid Glass aesthetic, or the extra conventional flat look of earlier generations of iOS.
Foundry | Alex Walker-Todd
HOW? Out of your lock display, press and maintain on a clean space till the lock display wallpaper zooms out. Subsequent, faucet the Customise button, which seems on the backside of the display. Bounding bins will seem round all the important thing UI components you’ll be able to work together with, together with the clock.
Faucet and drag on the seize deal with seen within the backside proper of the clock’s bounding field, after which merely drag downwards to increase the clock to your most well-liked top.
When you’re proud of the place of the lock display clock, faucet wherever throughout the clock’s bounding field to deliver up the Font & Color menu. In addition to adjusting font and color, there’s now a brand new Glass / Stable toggle, which you’ll be able to experiment with too.
Spatial Scene lock display
Sticking with lock display suggestions, iOS 26 additionally introduces a pretend 3D impact on sure photos. Known as Spatial Scenes, this impact might be utilized to your lock display.
Supplied you’ve chosen a lock display picture that the cellphone deems suitable with the function (normally one with a transparent foreground topic), it is best to have the ability to create a Spatial Scene lock display.
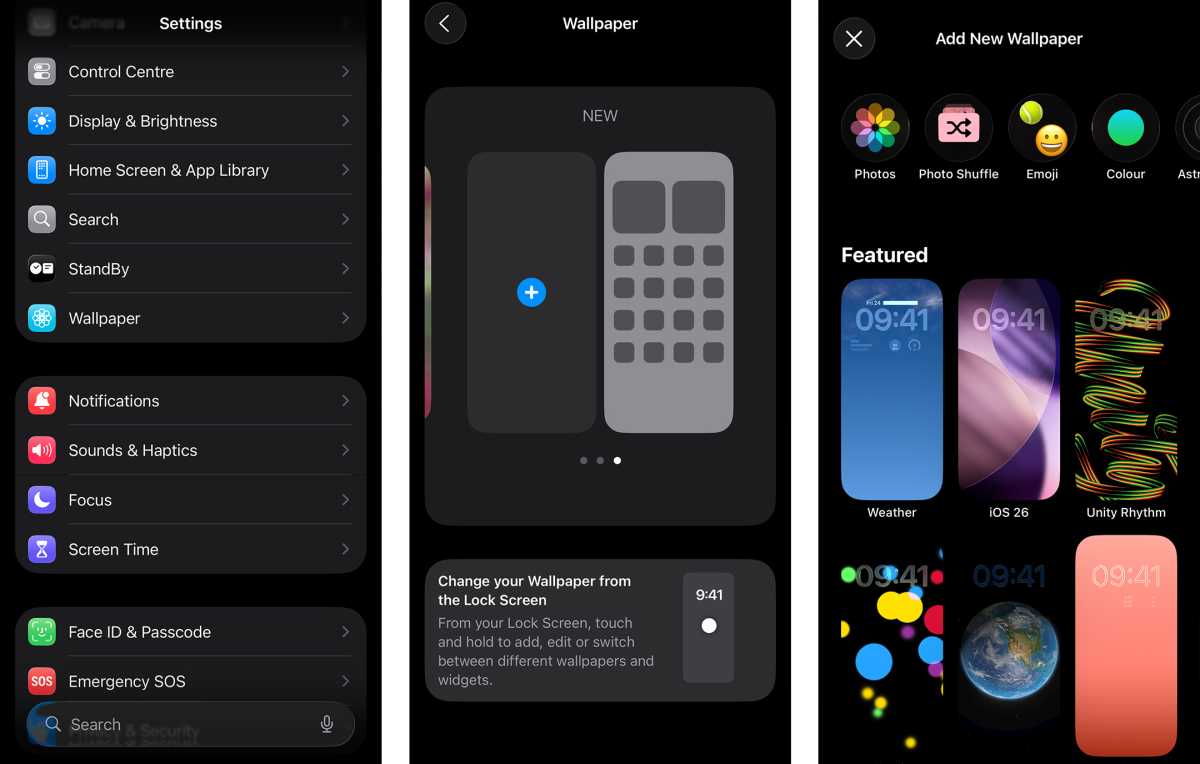

HOW? First, head to Settings after which search for and faucet on Wallpaper. From right here, faucet + Add New Wallpaper, or just swipe alongside till you see ‘New’ on the high, after which faucet the + icon to create a brand new wallpaper pair.
From right here, faucet on the Photographs app icon within the high left of the display. Subsequent, select a photograph you need to use as your lock display. Your cellphone will then change to a full-screen lock display preview, together with your chosen picture entrance and centre.
Supplied your cellphone deems the picture you’ve chosen suitable with Spatial Scenes, you’ll see two icons in direction of the underside proper of your display, simply above no matter lock display shortcut you’ve assigned within the backside proper nook (normally, it’s the Digital camera app).
The left of those two icons ought to resemble a hexagon with a strikethrough. To allow Spatial Scenes in your lock display, faucet this hexagonal icon. After a short little bit of processing, the place your cellphone will generate your new Spatial Scene lock display, faucet Add within the high proper of the display.
As you’re creating a brand new lock display from scratch, faucet Set as Wallpaper Pair on the next pop-up. You’ll then be taken again to the Wallpaper Settings display, however you’ll be able to swipe as much as shut Settings or just lock your cellphone.
Subsequent time you faucet the display or energy button to wake your cellphone up, you’ll have the ability to tilt your cellphone in your hand and benefit from the cool parallax impact of your newly-created Spatial Scene lock display.
Be aware: Spatial Scene wallpapers solely seem on the lock display. On your property display, they’ll simply current as static photos. Additionally, each time you alter your lock display picture, you’ll have to re-enable the Spatial Scene function. Your lock display will turn into static and dimmed if in case you have a Focus Mode – like Do Not Disturb or Sleep – lively.
Spatial Scene in Photographs
If you wish to see what the Spatial Scene impact can be like on a number of pictures in your gallery, with out having to undergo the rigamarole above every time, you’ll be able to simply view any suitable photos as Spatial Scenes, proper in iOS’ native Photographs app.

Alex Walker-Todd
HOW? Merely open Photographs, faucet on a picture you need to view as a Spatial Scene, and in case your iPhone decides it’s suitable, it is best to then see a small hexagonal icon with an arrow on its proper, in direction of the highest proper of the display.
Faucet the hexagonal icon and, after a second of processing, your chosen picture ought to now be a Spatial Scene. You possibly can view the 3D impact by merely tilting your cellphone in your hand.
Quicker haptics for a greater really feel
When Apple switched from an everyday standard spinning vibration motor (formally referred to as an ERM or Eccentric Rotating Mass) to its Taptic Engine (Apple’s branded tackle a Linear Resonant Actuator or LRA) again in 2015, it utterly reworked the texture of interacting with an iPhone.
The Taptic Engine is a lot better than a spinning motor at conveying completely different sensations through haptics, with better precision, power and distinction.
Foundry | Alex Walker-Todd
Efficiency is already usually nice on the iPhone 17 sequence, however in order for you your cellphone to really feel even snappier, this one tweak within the Settings menu will make your gadget really feel even quicker.
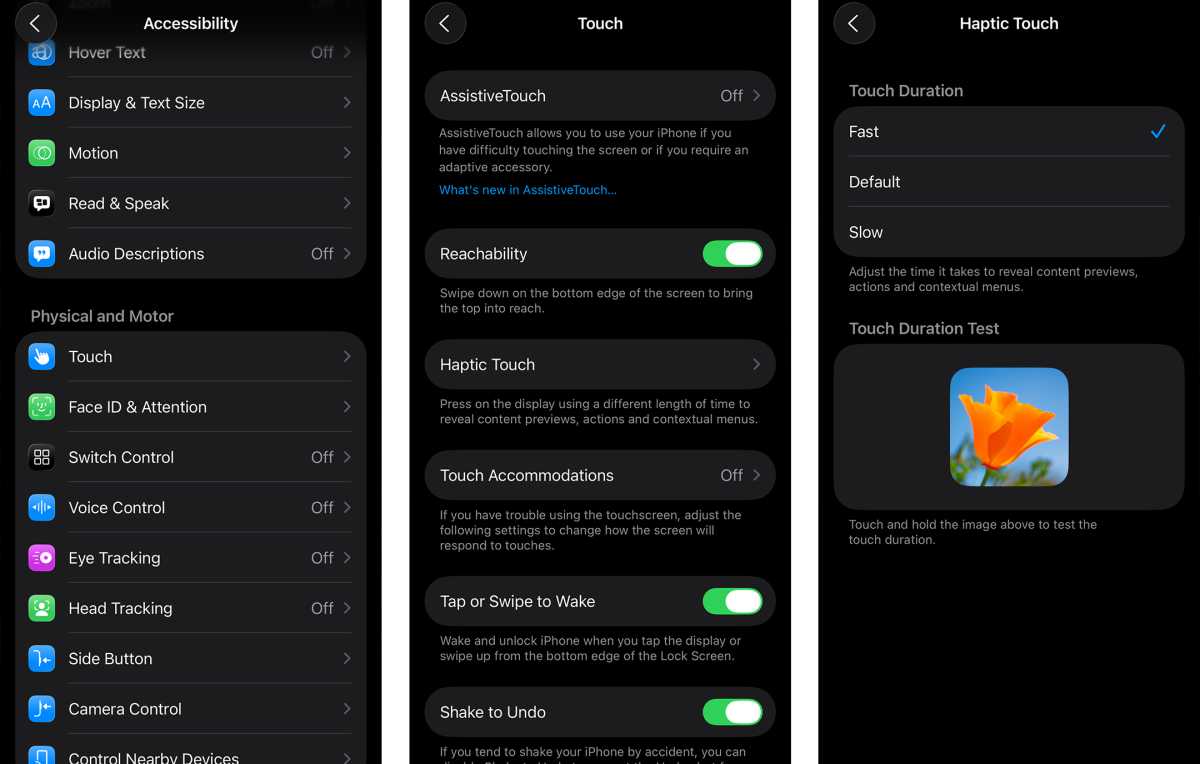
HOW? Head to Settings, scroll down and faucet on Accessibility, and search for Contact. Throughout the Contact menu, the third choice must be Haptic Contact. Choose this and also you’ll be introduced with three length choices, with a take a look at button beneath.
Out the field, your iPhone’s haptic contact length will possible be set to Default, however strive the opposite two choices out, or just change it to Quick, with a faucet.
When you’re proud of the brand new really feel of your iPhone’s haptics, again out of the Settings app with a swipe up from the underside of the display.
Hidden keyboard shortcuts
There’s extra to the iOS keyboard than meets the attention. Regardless of the criticism the iOS keyboard has come beneath, it does additionally boast a bunch of highly effective hidden options, which until you already know about, are simply missed.
In addition to swipe-typing (the place you don’t carry your finger from the display between key presses to sort a phrase), do you know you don’t need to toggle Shift or the numbers key to entry capital letters and numbers? You possibly can even transfer a cursor round to shortly scrub by textual content with out ever having to the touch a textual content field, and there are compact left and right-justified keyboards, all unseen, however proper at your fingertips.
Foundry | Alex Walker-Todd
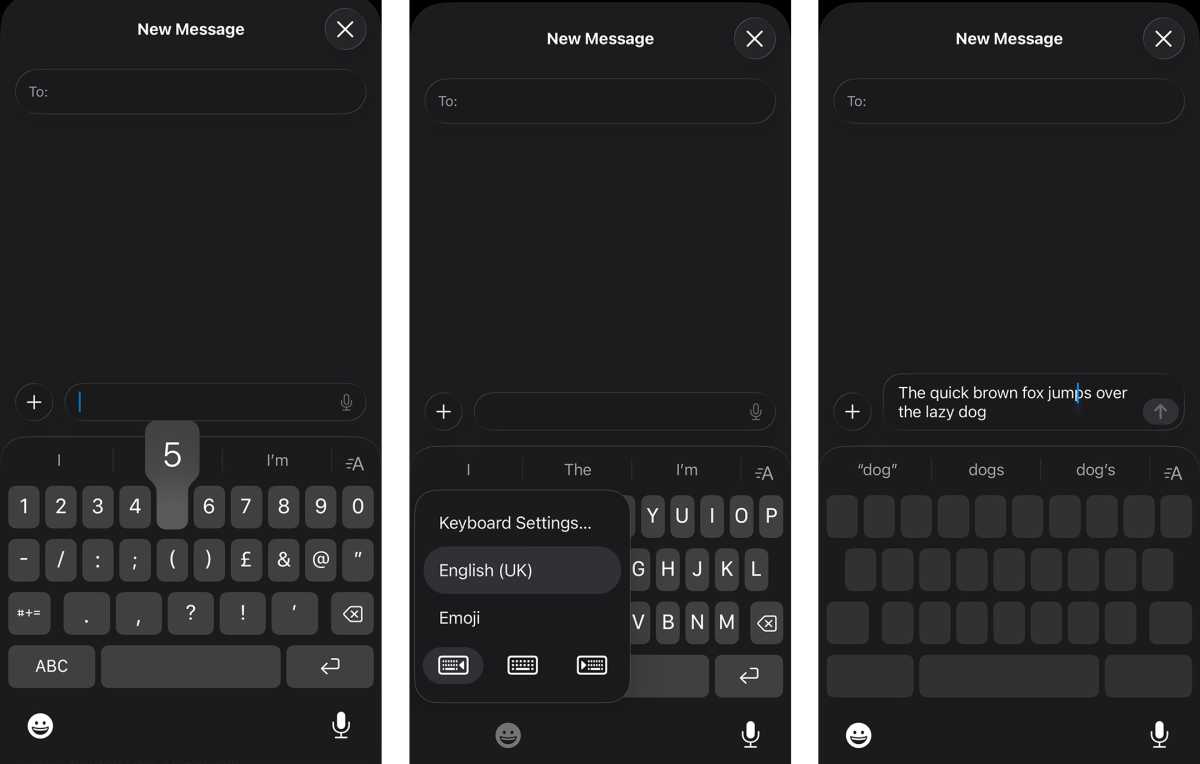
HOW? Entry to most of those hidden options comes all the way down to a tap-and-hold gesture.
Within the case of capitalisation, fairly than tapping the Shift key, after which tapping the letter you need capitalised, you’ll be able to merely long-press on the shift key and – with out taking your finger off the display – drag over to the letter you need capitalised. Releasing your finger will then create a capital letter and change the keyboard again to decrease case in a single fell swoop.
Equally, fairly than tapping the numbers key, deciding on the quantity you need after which switching again to the letter view in your keyboard, you’ll be able to simply long-press on the numbers key, drag your finger over to the quantity you need, and launch.
Lengthy-pressing on the emoji key within the backside proper, beneath your keyboard brings up a menu which incorporates three keyboard format choice: the full-width keyboard you’re possible already utilizing, or a left or right-justified compact keyboard, good for one-handed typing. Simply drag your finger over and launch in your most well-liked format, or faucet on the format you need to use.
Lastly, fairly than long-pressing on a textual content field and utilizing the resultant magnifying glass to see the place the cursor is as you scrub by textual content, long-press on the spacebar as a substitute. You’ll see the letters of the keyboard disappear, whilst you stay involved with the display, successfully turning it right into a trackpad, which you’ll be able to then swipe round to extra simply transfer the cursor in a given textual content entry area above.
Disable Management Centre in your lock display
Management Centre is the de facto strategy to shortly toggle or entry key options in your iPhone, however the comfort on provide is one thing of a double-edged sword, particularly the place theft is anxious.
Whereas options like Discover My iPhone are extremely useful and highly effective, their real-time monitoring hinges in your cellphone’s potential to keep up a mobile, Wi-Fi and/or Bluetooth connection. A savvy legal who simply swiped your gadget might shortly interact Airplane Mode with out ever needing to unlock your cellphone or enter your passcode, primarily chopping off the breadcrumb path Discover My tries to depart.
Foundry | Alex Walker-Todd
One of the best defence – on the expense of solely slightly comfort – is to disable Management Centre entry out of your lock display.
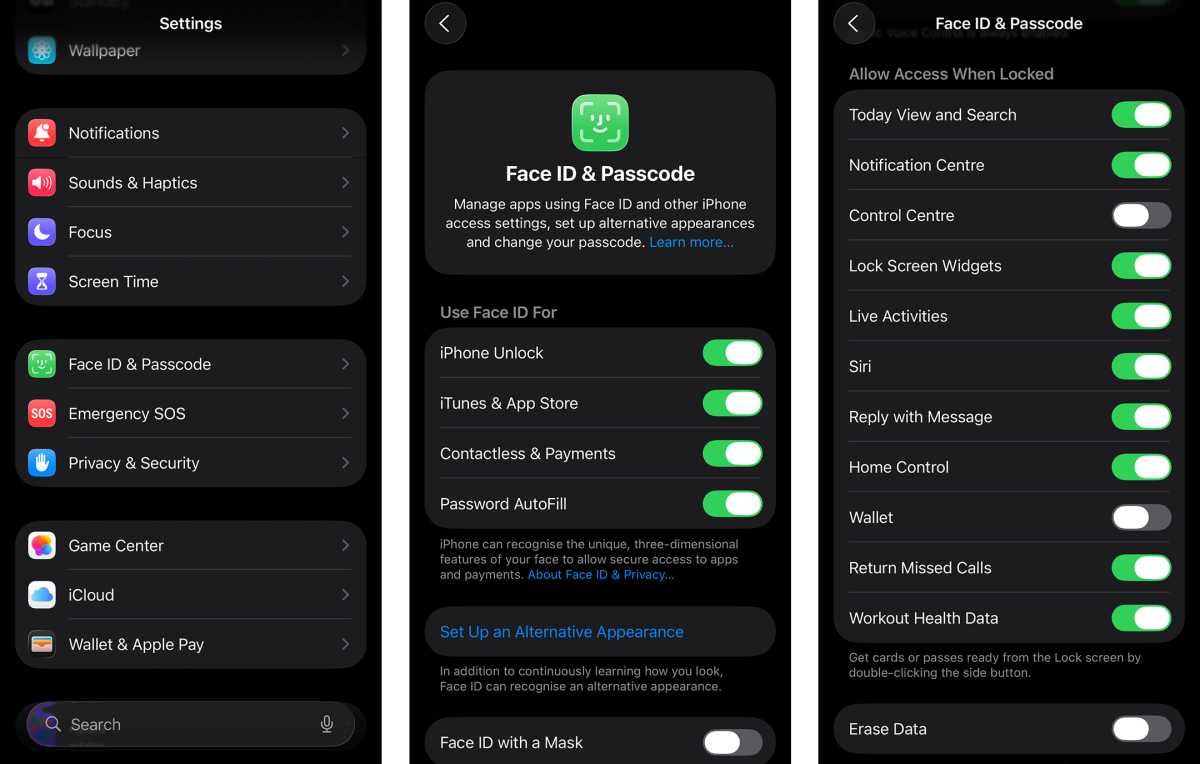
HOW? Head to the Settings app, then scroll all the way down to and faucet on Face ID & Passcode. Enter your gadget’s passcode on the subsequent display and also you’ll then be introduced with a run of various safety settings.
Scroll all the way down to the Enable Entry When Locked part, and lastly faucet the toggle subsequent to Management Centre to disable entry to the function in your lock display.
To check it, lock your cellphone, wake it again up and take a look at swiping down from the highest proper nook of your lock display. Management Centre ought to not seem.
Set a customized ringtone
Creating or setting your individual ringtone was all the craze, however Apple made the method on iPhone slightly too convoluted for many customers, pushing them to purchase ringtones by iTunes or just depend on the pre-loaded default ringtones.
Fortunately, these days, it’s a lot simpler to set your individual customized ringtone, offered you’ve a suitable audio file (akin to a .mp3 or .m4a) handy.
Foundry | Alex Walker-Todd
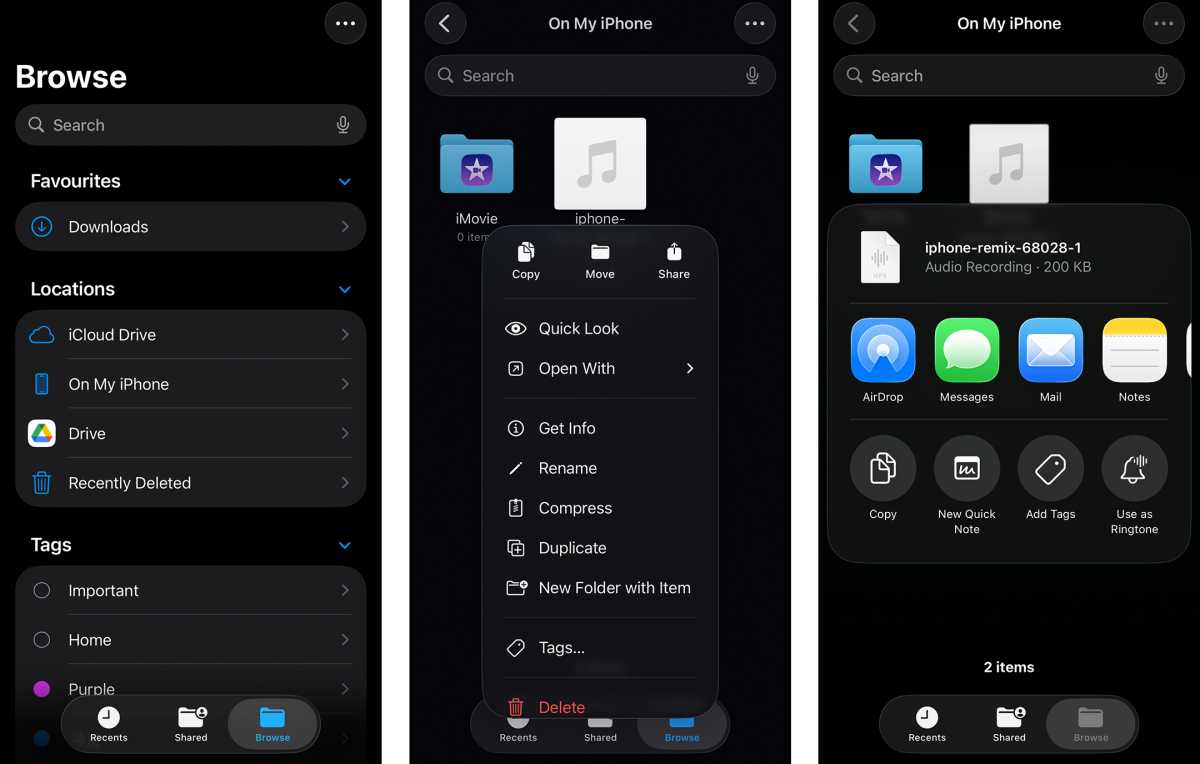
HOW? When you’ve downloaded the audio file you need to use as your new ringtone to the Information app, open the app and discover your downloaded audio.
Lengthy-press on the file and on the next pop-up menu, faucet Share. In direction of the underside of the Share display that follows, you’ll see the choice to Use As Ringtone.
Be aware: Audio information should be shorter than 30 seconds to work as a ringtone.
Battery Share
A small however helpful tweak to the look of iOS comes with enabling Battery Share. Whereas Apple would in all probability fairly you don’t take into consideration battery life an excessive amount of and easily fork out for one in every of its newest chargers or MagSafe equipment, with the ability to preserve tabs in your cellphone’s cost, or see how enabling/disabling completely different options impacts longevity is helpful.
Particularly for these of you who’ve opted for the super-slimline new iPhone Air, battery life is arguably one of the vital necessary points of the cellphone’s efficiency to be monitored.
Foundry | Alex Walker-Todd
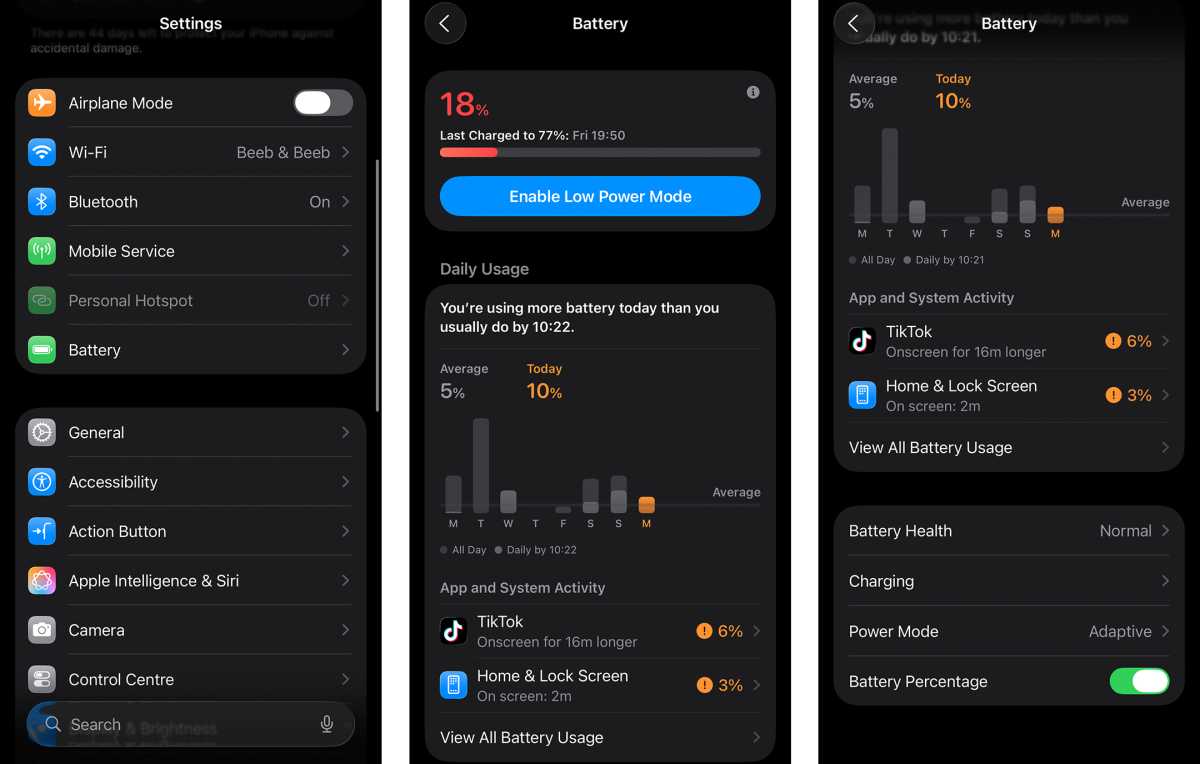
Turning on Battery Share makes it a lot clearer the place your battery life is at at a given second. As soon as enabled, fairly than a battery icon within the high proper of the display that merely reduces in measurement as you employ your cellphone, the image will even include a quantity, which pertains to obtainable cost remaining.
HOW? To see battery proportion, open Settings, scroll down and faucet on Battery, and on the subsequent display, scroll down once more and search for the Battery Share toggle. Flip it on and also you’ll instantly see the battery icon within the high proper replace to incorporate your gadget’s present cost stage.
Set a Cost Restrict
When you’re the sort of iPhone proprietor who retains maintain of their gadget for a number of years, you’re going to massively respect the Cost Restrict function.
The character of present Li-ion smartphone batteries is that they function finest at between roughly 20% and 80% cost, and totally depleting to 0% or charging to 100% has truly been proven to scale back battery well being over time, that means the precise quantity of cost your battery holds on to after multi cost cycles – even when it nonetheless claims to be 100% – is probably going loads much less.

Foundry | Alex Walker-Todd
To fight this, cellphone makers akin to Apple have began added cost limiting performance to their software program expertise with the intention to prolong long-term battery well being.
HOW? Head to Settings, scroll all the way down to and faucet on Battery, after which search for Charging, in direction of the underside of the Battery display. Throughout the Charging sub-menu, you’ll see a Cost Restrict slider, which generally might be set to 100% by default.
Drag the slider down as little as you’re comfy with, figuring out that the extra strict the cost restrict, the higher your battery well being might be over time (I’d advocate 80%).
Be aware: When you determine you don’t need to use a Cost Restrict, at the very least make certain Optimised Battery Charging is enabled on the identical Charging settings display. When charging your cellphone in a single day, this may restrict cost to 80% for almost all of the evening, till simply earlier than you get up and begin utilizing your gadget, at which level the cellphone will proceed to fill as much as the complete 100%.
Allow Adaptive Energy Mode
Chances are high, you don’t have to run your iPhone at full brightness or with the chipset working at full tilt the entire time and, whereas iOS natively adjusts these points dynamically, there’s a extra aggressive choice when your iPhone detects greater energy draw than ordinary.
Enabling Adaptive Energy Mode routinely scales again issues like brightness stage, or will activate Decrease Energy Mode within the pursuit of prolonging battery life.
Foundry | Alex Walker-Todd
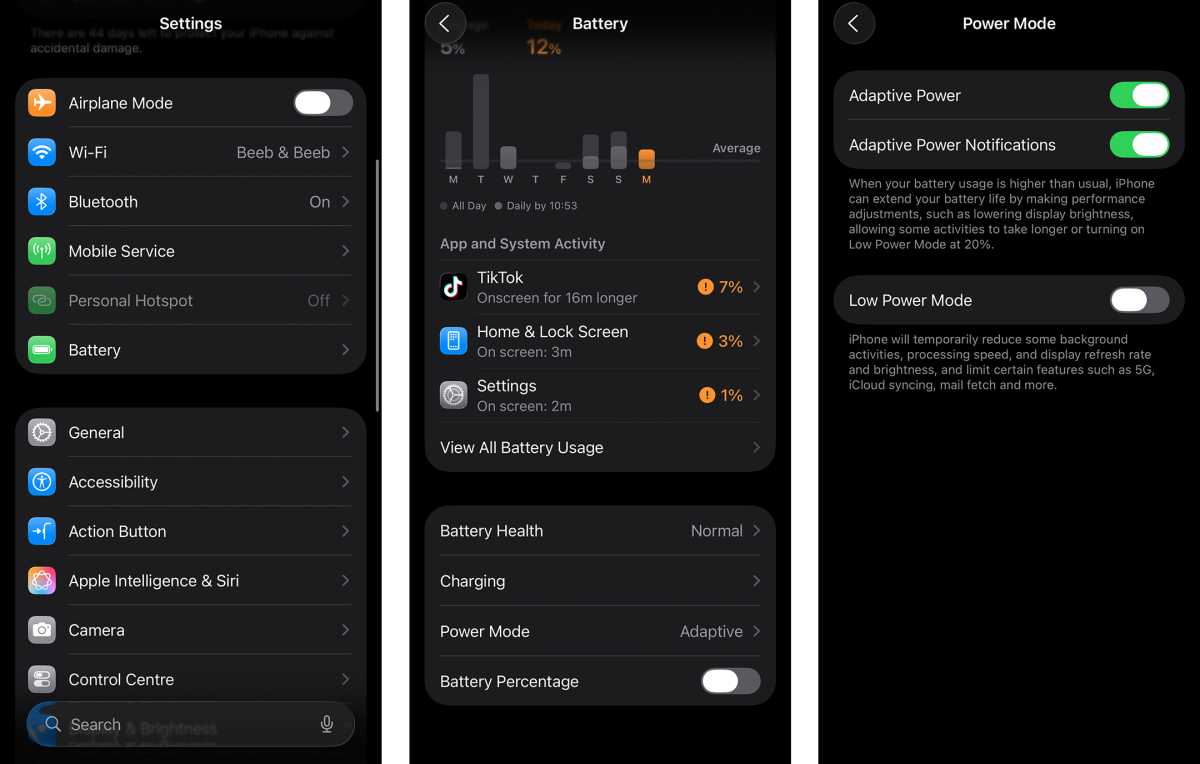
How? To show this function on, head to the Settings menu after which, as soon as once more, faucet on Battery. Scroll down the Battery sub-menu and the penultimate choice must be Energy Mode. Opening up the Energy Mode menu, you’ll then be introduced with a trio of toggles, the highest one being Adaptive Energy. Flip this on and your iPhone will extra aggressively monitor its energy calls for towards battery longevity.
Be aware: If you would like extra perception into what Adaptive Energy is doing, you too can toggle on Adaptive Energy Notifications for extra info.
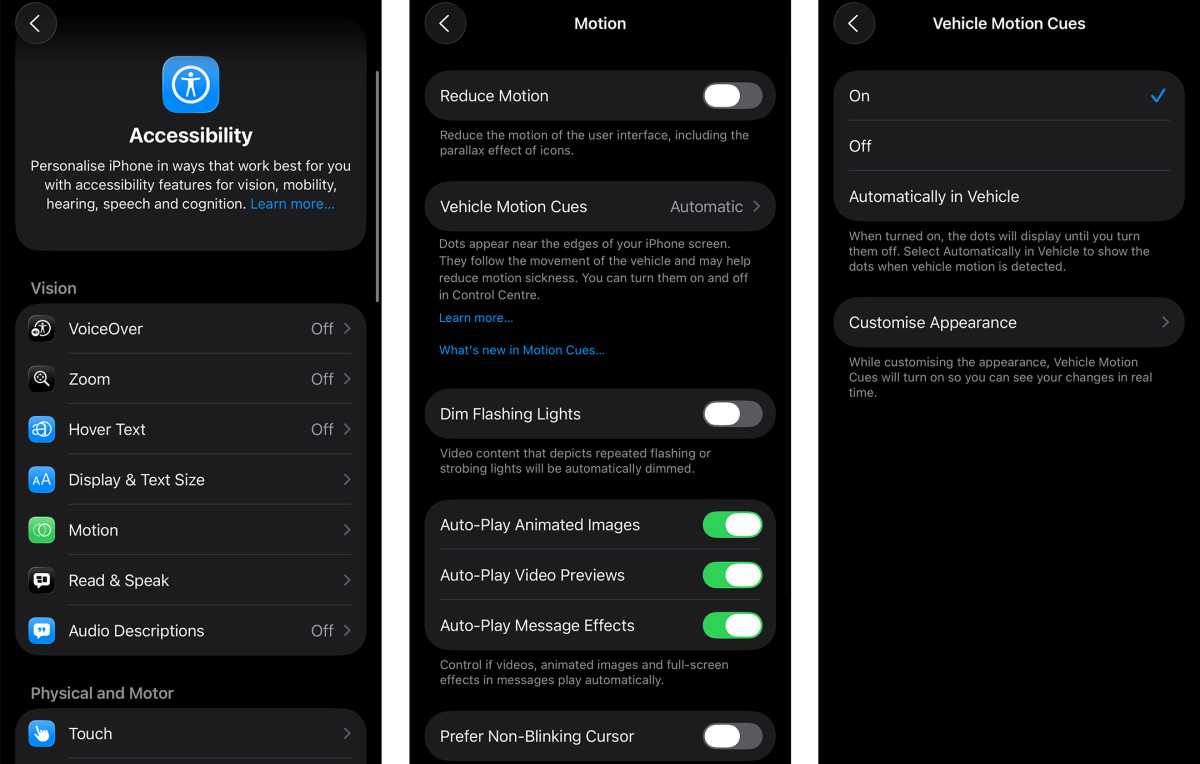
Activate Car Movement Cues
Whether or not you’re a passenger princess or the primary to name “shotgun!”, in case your cellphone use brings on movement illness when using in a automotive (or bus or boat), Movement Cues is likely to be the answer.
This accessibility function provides little dots across the edges of no matter it’s you’re on display and, utilizing movement information out of your cellphone’s numerous sensors, strikes these dots in opposition to any movement you could be experiencing whereas travelling. The dots give your mind slightly one thing to latch on to, and assist scale back the sense of nausea that may come from a cellphone display on the go.
Foundry | Alex Walker-Todd
HOW? Open the Settings app and scroll all the way down to Accessibility, discovered just below the Common choice. Inside Accessibility, it is best to see an choice referred to as Movement: faucet on this. Faucet Mechanically in Car for it solely to provoke when your cellphone detects you’re in a transferring automobile, in any other case you’ll be able to change it On or Off as you see match.
Be aware: Tapping Customise Look will allow you to customise the look of the movement cue dots, when it comes to place, color, variety of dots and measurement of dots.
Make Apple Intelligence… extra clever
Regardless of Apple’s ever-evolving Siri expertise and, extra lately, Apple Intelligence, the corporate’s efforts within the AI division have been… missing, in comparison with a lot of the competitors.
In reality, Apple’s had a lot hassle constructing a reliable AI expertise of its personal that it’s turned to one of the vital outstanding gamers within the house, OpenAI; baking its assistive ChatGPT expertise into iOS and, extra particularly, Apple Intelligence.
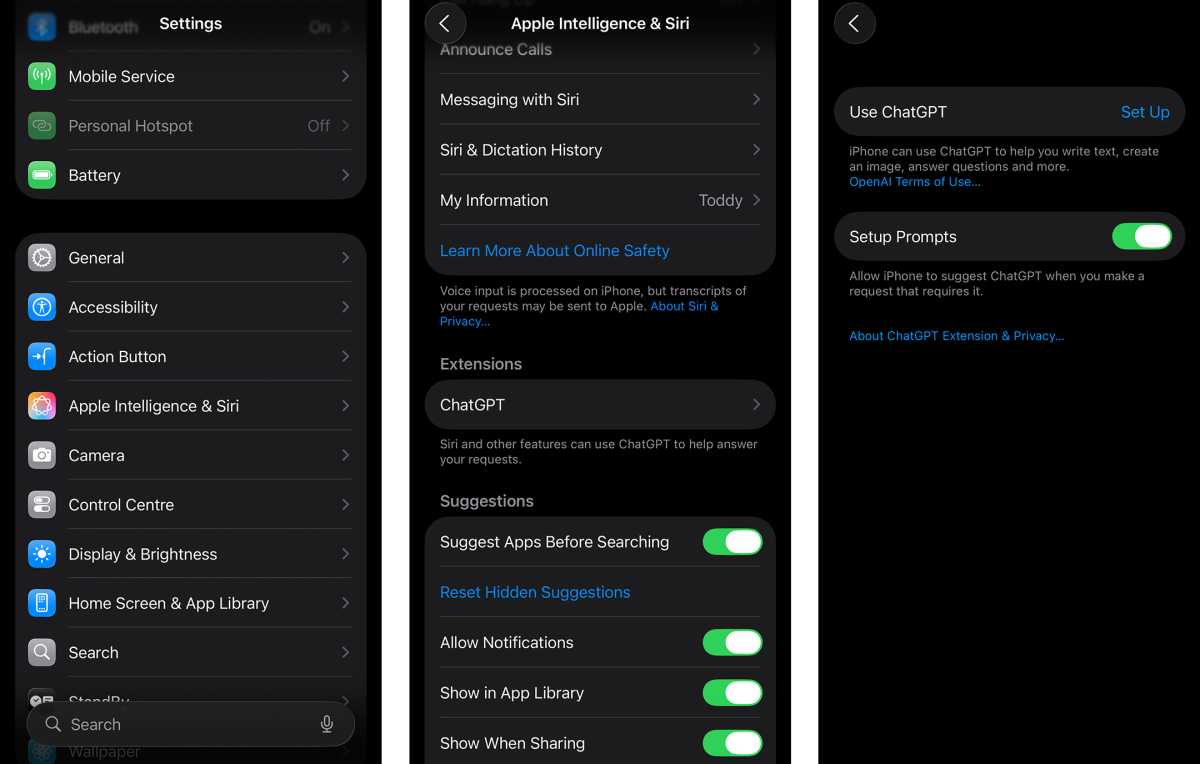
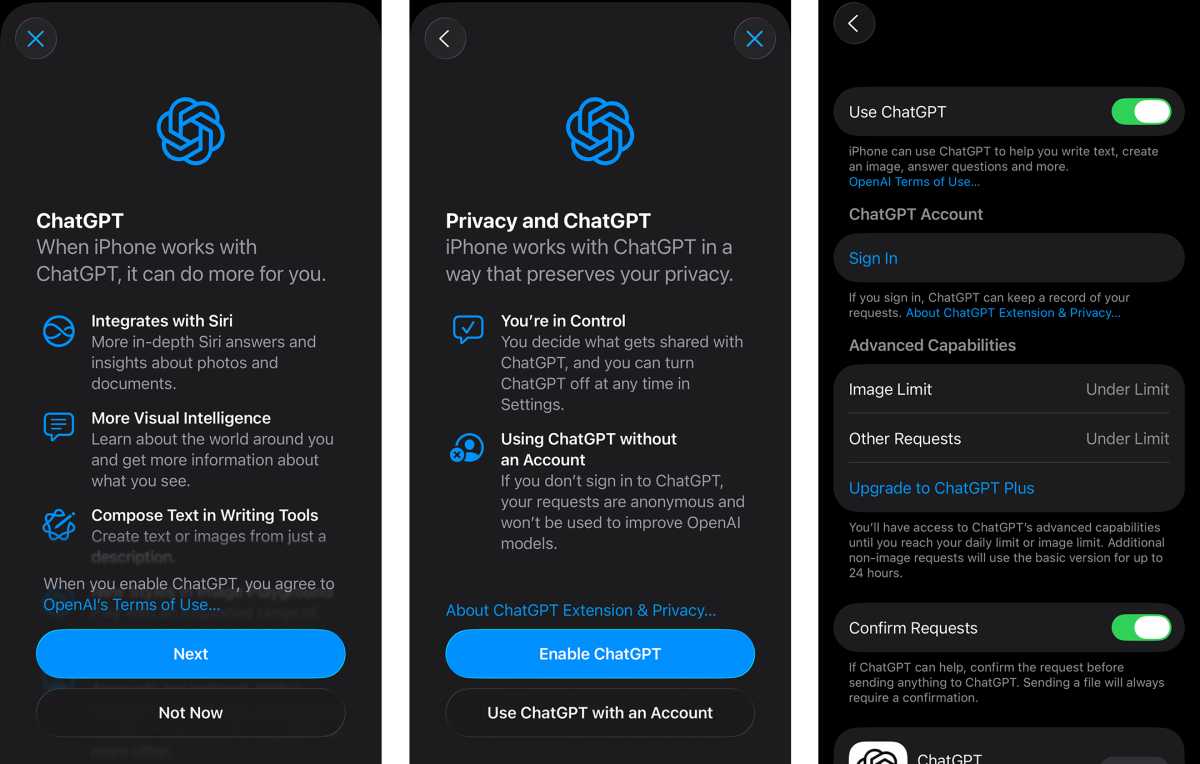
HOW? So as to add ChatGPT search and outcomes into iOS, open Settings, scroll down and faucet on Apple Intelligence & Siri. On the subsequent display, scroll all the way down to a piece referred to as Extensions, and it is best to see ChatGPT as an choice. Faucet on ChatGPT, and also you’ll transfer to a different display, with the phrases Set Up subsequent to Use ChatGPT, which you have to faucet to proceed.
Faucet Subsequent on the ChatGPT pop-up display, adopted by Allow ChatGPT in direction of the underside of your display, and also you’ll then be good to go.
Be aware: You don’t want a ChatGPT account or the ChatGPT app put in in your iPhone with the intention to use this function, however you’ll be able to log in from the identical ChatGPT sub-menu in the event you do have one.
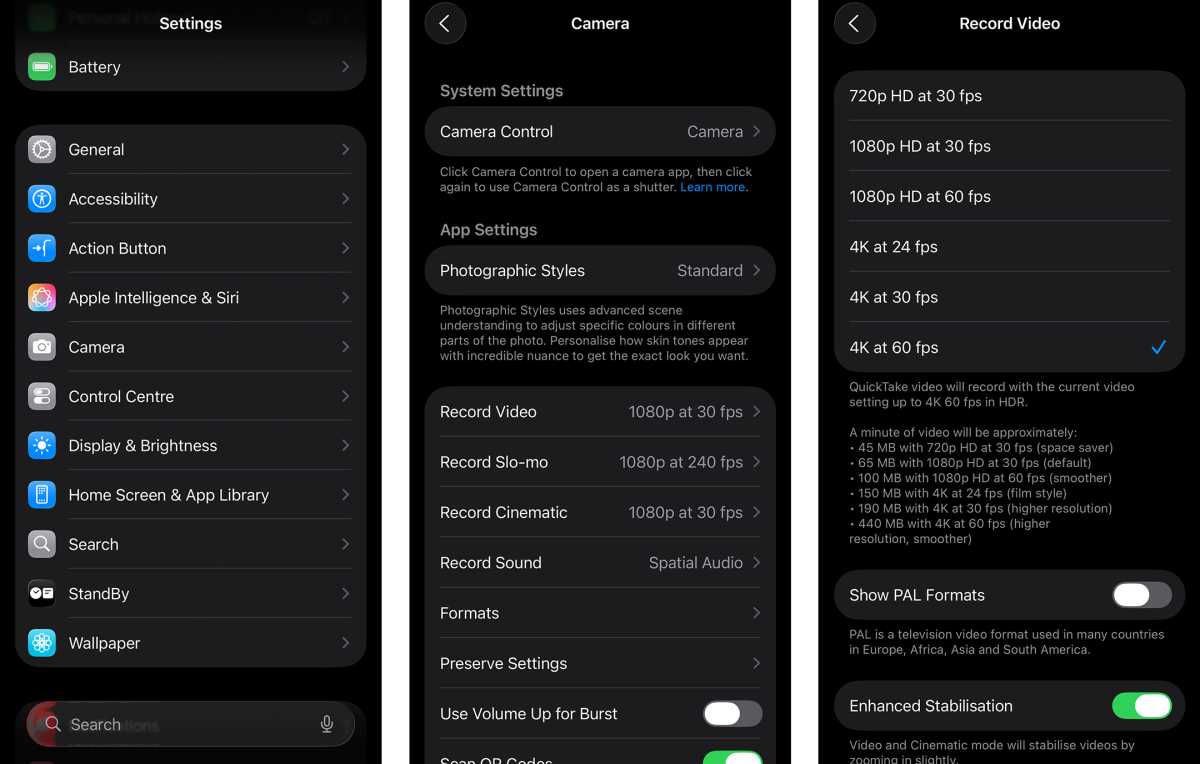
4K 60fps video by default
The iPhone 17 sequence all possess impressively competent cameras, however in the event you’re somebody who shoots quite a lot of video, the out-of-box settings seize sub-par footage, with the 1080p 30fps being the default decision and body charge.
Dive into your cellphone’s Digital camera settings, nevertheless, and you may improve the seize decision to 4K (that’s 4 instances the default), in addition to upping the body charge (as much as 120fps, relying in your mannequin of iPhone).
Foundry | Alex Walker-Todd
HOW? Head into your cellphone’s Settings app, open up the Digital camera sub-menu, faucet on Report Video and choose 4K at 60fps, as a sure-fire approach to make sure you get this decision and body charge each time you turn to video mode within the native Digital camera app.
Alternatively, open the Digital camera app, faucet Video on the backside of the display (when holding your cellphone in portrait) to change to video recording mode, after which faucet the decision and body charge button within the high left of the viewfinder. You’ll see the button increase to indicate assorted resolutions and body charges, which you’ll be able to choose independently, simply by tapping on the configuration you need.
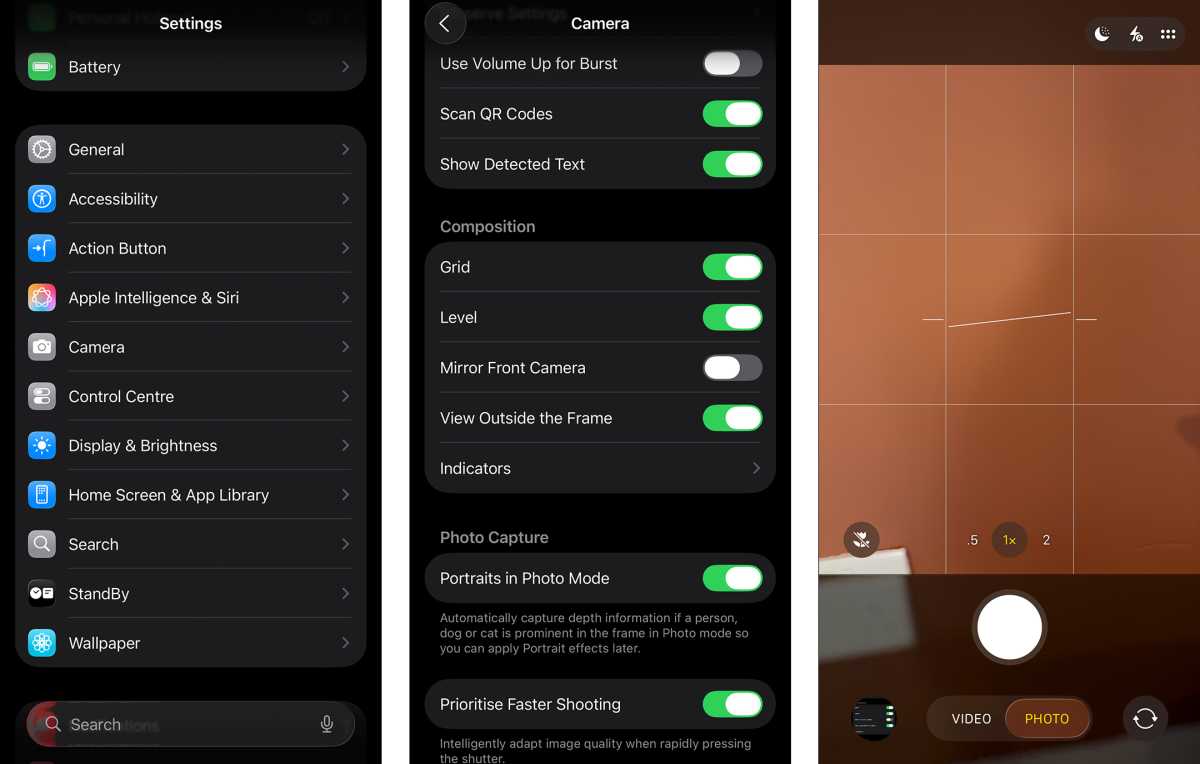
Add a grid and stage to your digital camera
When you’re severe about snapping photos or taking pictures video together with your iPhone, there are a few helpful instruments to assist with framing, which I allow on each iPhone I take advantage of.
Grid provides a 3×3 grid throughout the viewfinder that will help you higher body up your topic, permitting you to use established photographic rules, just like the rule of thirds (whether or not you realise it or not).
Foundry | Alex Walker-Todd
Stage, in the meantime, acts like a spirit stage, utilizing the cellphone’s inner sensors to determine whether or not your cellphone’s digital camera is perpendicular to the bottom and straight, serving to mitigate perspective distortion of your topic (if that’s one thing you’re attempting to keep away from).
When you’re pointing your digital camera instantly down on the floor, the extent switches to a crosshair, which supplies you perception into the pitch and roll of your cellphone; permitting you to ensure it’s completely parallel to the bottom, or angled offset as a lot as you want.
HOW? Open the Settings app and faucet on the Digital camera sub-menu. From right here, scroll all the way down to the Composition part, the place it is best to discover Grid and Stage on the high of the record, with toggles beside every one you could faucet to allow.
Subsequent time you open your digital camera, it is best to then see each the grid and stage working as promised.
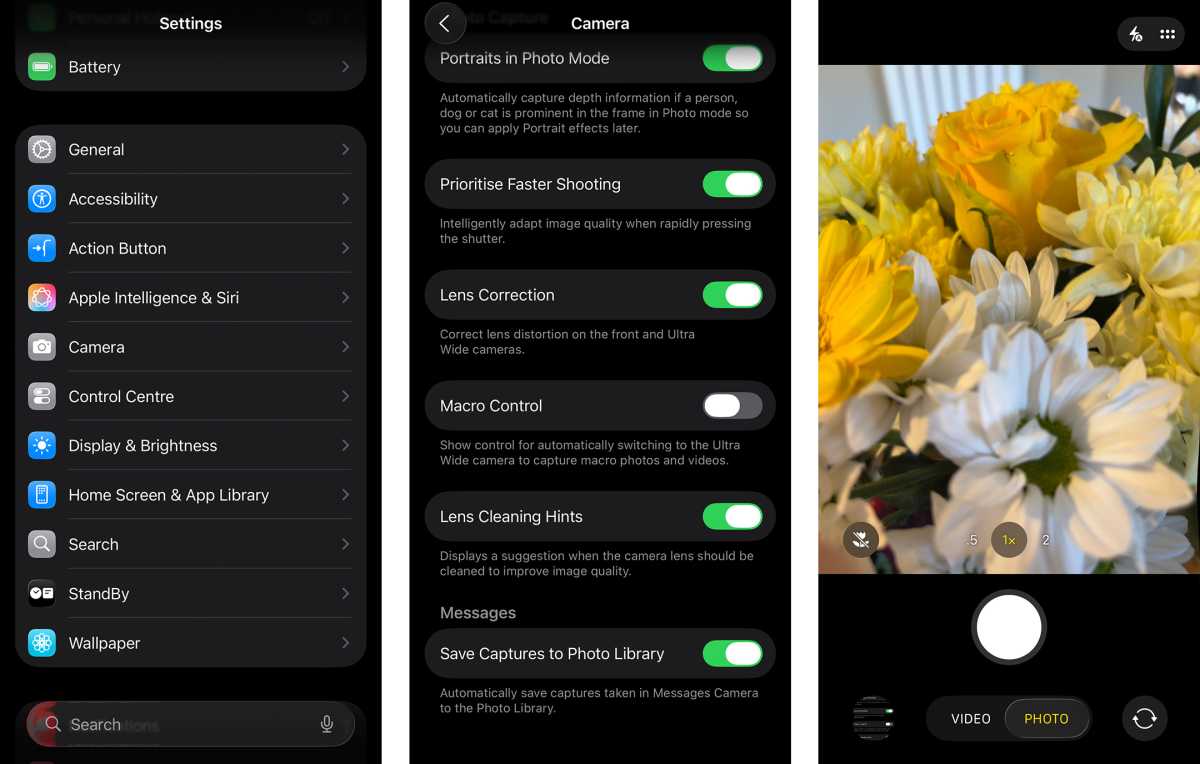
Disable Macro Management
One of many minor annoyances I’ve with the native iPhone digital camera expertise has to do with macro pictures. By default, while you deliver your iPhone’s digital camera near a topic (just a few centimetres away), it’ll routinely change to Macro Mode, which includes transferring from the cellphone’s predominant, to its ultrawide lens.
Whereas this change means you will get a lot nearer to your topic, the weaker talents of the smaller ultrawide sensor in comparison with the principle digital camera turn into evident. Pictures usually undergo from weaker dynamic vary, extra processing and a lesser depth of area.
Foundry | Alex Walker-Todd
When the cellphone switches to Macro Mode, you do have the choice to toggle again to your cellphone’s predominant sensor by tapping the flower icon which seems on display, however this can be a short-term repair.
If, like me, you’re completely satisfied to take macro pictures with the principle lens from slightly additional away within the pursuit of a greater total picture, change this one function.
HOW? Open the Settings app, then scroll down and faucet on Digital camera. Scroll all the way in which all the way down to the underside of the Digital camera sub-menu and some toggles up from the underside it is best to see an choice titled Macro Management. Faucet on it to disable the auto-switch.
Be aware: Disabling Macro Management means you need to repeat this course of and faucet the toggle as soon as extra to re-enable any type of macro seize, which is slightly irritating and long-winded, however feels just like the lesser of two evils.